VS Code, PHP, and Win 10: A Step by Step Setup Guide

During a new laptop build, I had issues with syntax validation for PHP in VS Code. Most online guides show how to set this up by using WAMP, XAMPP or other packages to implement a full stack locally. For most, using WAMP is likely the easiest solution.

However, for me that’s not desired, as I prefer a minimal setup of VS Code but with solid PHP syntax validation locally. I also don’t want to use MariaDB, as my sites all use MySQL.

Download & Install Visual Studio Code

Go to https://code.visualstudio.com/ and scroll down to the download section:

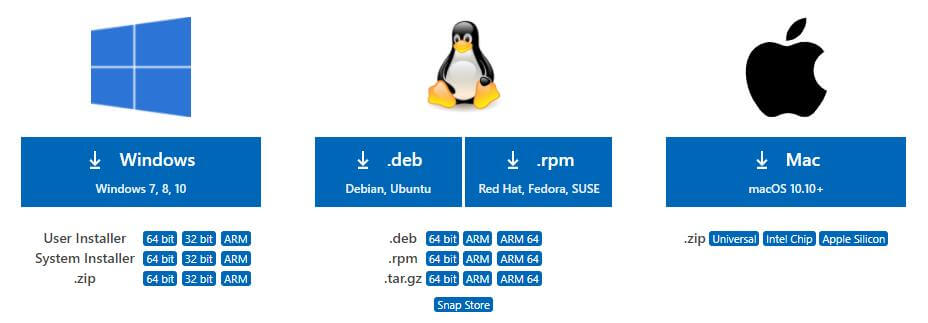
Download options for Visual Studio Code

Select the System Installer if you’re the only person using the PC. If there are multiple users who want different settings, select the User Installer instead. Apart from settings management the two versions have the same functions and features.

Install PHP on Windows 10

Download the latest PHP 8 x64 Thread Safe zipped up file from windows.php.net/downloads.php.

Create folder C:\php and extract the zip archive into this location. You should now have php.exe and a number of other files in this location:

Example files from PHP installation on Windows

Edit PHP Configuration

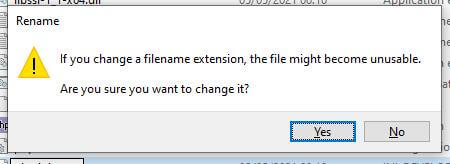
The default php.ini configuration file doesn’t exist in the downloaded package, so copy & rename php.ini-development to php.ini. Select Yes on the dialogue that pops up:

Windows dialogue box

There will be a number of edits required in the php.ini file, use any text editor.

Enable PHP Extensions

Enable any required extensions you want to use, by removing the ; (semi-colon) in front of the line. Some common defaults:

extension=curl
extension=gd
extension=mbstring
extension=pdo_mysql
extension=exif
extension=mysqli
extension=openssl

Add C:\php to PATH

Without php in the PATH, Windows can’t find the executable so it needs to be added.

Go to Windows Start then type ‘environment’. Select Edit the system environment variables.

Then select the Advanced tab and the Environment Variables button.

Scroll down the System Variables options and select Path and then Edit.

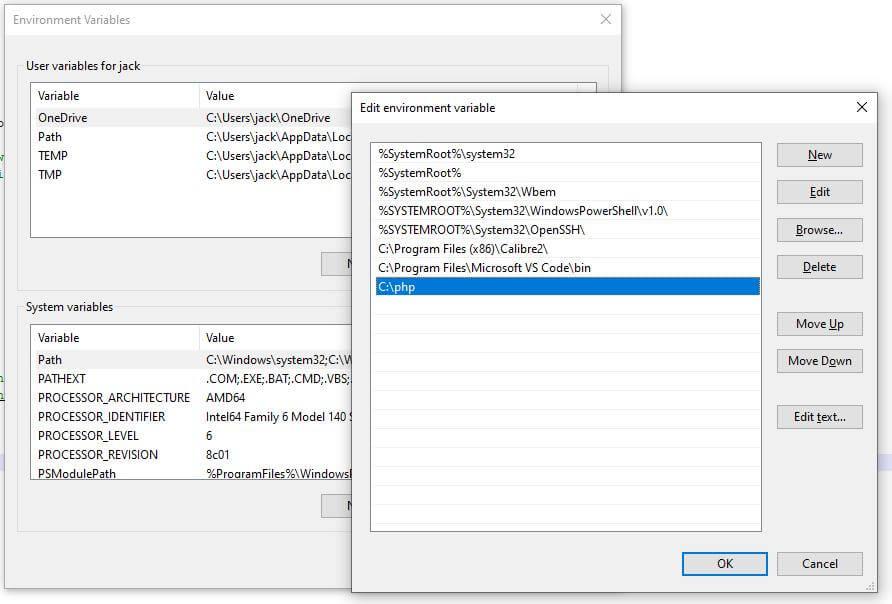
Click New and add C:\php.

Example for setting a new PATH in windows environment variables

Select OK and click your way out of the dialogue boxes.

Configure Visual Studio Code

Open VS Code, and go to the extensions view (icon with 4 boxes on the left):

PHP Intelephense VS Code extension illustration

Search for PHP and install PHP Intelephense and PHP DocBlocker. These two extensions really help write PHP code faster.

It looks like the popular PHP Intellisense extension is abandoned as of May 2021 (github.com/felixfbecker/vscode-php-intellisense). This caused me some issues as an older computer installation was working fine with my settings, but new laptop didn’t. PHP Intelephense has all the features you want.

I also use these extensions:

  • All Autocomplete – Provides autocompletion in Visual Studio Code items based on all open editors
  • Error Lens – Better error highlighting
  • ESLint – Provides ESLint capabilities directly in VS Code
  • PHP Dockblocker – Improves Intelephense with creating phpdoc type comments
  • PHP Namespace Resolver – Allows better imports of classes and resolving any namespace conflicts

Now disable VS Code’s built-in PHP IntelliSense by setting php.suggest.basic to false to avoid duplicate suggestions. Do this by opening File > Preferences > Settings and search for php again:

Example settings in Visual Studio Code

Done! Now you have PHP running in VS Code

Your VS Code should now handle PHP coding with aplomb, saving you some effort in both writing and syntax checking your code as you go.

Part of laptop screen showing Wordpress Admin Area

How to Fix WordPress File Permissions Issues

For anyone working on WordPress sites, the dreaded message that WordPress requires FTP credentials to add a plugin or remove one will come up. Or that theme files can’t be edited.

File ownership mismatch often causes errors in WordPress

Most of these stem from mismatches in file and folder ownership on your Linux server.

Typical examples would be images or files uploaded directly to the server rather than via WordPress, such as when restoring a backup while logged in as the ROOT user. WordPress tends to run as the Apache user, which means WordPress then cannot edit the files or delete them.

What is needed is to change ownership from the current owner, to the Apache user (or whichever user & group Apache runs as):

# sudo chown apache:apache /var/www/html -R

This instructs Linux to change ownership with the chown command, to the user apache, in the group apache at the specific file / folder location (/var/www/html, the normal web directory for RHEL/Centos). The flag ‘-R’ means recursive, so the command will be applied to all files in the specified folder, and all subfolders and files.

However, doing this manually will be forgotten at some point, so a better solution is to automate it with a cron job. Cron jobs are tasks that run on a specified schedule in Linux.

Cron jobs are usually located at /etc/crontab but some Linux distributions put it elsewhere. So we’ll make a cron job running every hour by placing only one of the below instructions into the file at the bottom:

0 \* \* \* \* chown apache:apache /var/www/html -R >/dev/null 2>&1
@hourly chown apache:apache /var/www/html -R >/dev/null 2>&1

This will now run your command every hour once the file is saved. The >/dev/null 2>&1 end of the command means any output will be silenced, so you’re not getting alerted each time the cron job runs. It will also mean errors won’t be communicated.

For Shared Hosting

You may not have access to the crontab or a cron job manager if you’re on a shared hosting plan, but there are other fixes which can be applied to WordPress.

You should be able to edit your wp-config.php file (in the www home directory).

Insert the following code at the end of file:

/** Sets up 'direct' method for WordPress to enable update/auto update with out FTP */
define('FS_METHOD','direct');

Once that’s saved, WordPress should now be able to update itself and plugins without errors, and also install and delete plugins.

Non-Wordpress Sites

The chown fix will work on any website with the same type of file permissions issue, as it’s likely the Apache user isn’t the file owner.

More on Cron Jobs

Linode has a good article about how cron jobs work. And Crontab.guru has a huge list of example cron job commands.

PHP code from Wordpress

Custom wp-config for wordpress behind reverse proxy & using a staging server

WordPress, especially in version 5+, is an amazing piece of software. However, in certain situations the default code falls short. Recently, I needed to set up WordPress behind a reverse proxy, parallel-host a staging server, and use both a visual page builder and a javascript-based translation plugin.

And all of it needed to be easy-to-use for non-technical client marketing staff.

In short: A complicated setup.

The client should be able to edit and post content in a simple way, which isn’t possible in a reverse proxy setup when using a page builder. This is because the WP_HOME setting (i.e. the homepage URL) will direct any navigation from the hosting server to the public URL, the one we’re marketing to customers as well as doing SEO for. And neither our page builder or the translation plugin will work from the public domain!

I also needed the client’s web team to be able to backup and restore the site in a somewhat user-friendly way.

The code isn’t complicated to set up once it was tested in a few variations to see what worked best. Please note this doesn’t cover any Apache or nginx settings to set up the reverse proxy, as configuring and troubleshooting is best left to a hosting specialist. No special settings were needed on a typical LAMP stack for this custom code to work.

Full code at the end.

Why Modify wp-config.php?

The config file for WordPress is the most reliable place to put custom configs as it doesn’t get overwritten by WP updates, and any code here is executed before any HTML output. This is important as cookies and headers must be set before any HTML is sent to the browser.

It also executes very quickly, as WP loads files in this order:

  1. index.php
  2. wp-blog-header.php
  3. wp-load.php and template-loader.php
  4. wp-config.php loaded by wp-load.php

URL Settings

The setup only requires 3 values to be set. First we need to know the public homepage URL ($public_url), which is the front-end of our reverse proxy. This is a fully qualified URL.

Then we need the actual hosting domains for $production_server (production.example.com) and $staging_server (stage.example.com) servers. These use subdomains but could easily be domain1.com and domain2.com with no changes.

We’re not qualifying these URLs as the PHP server variable we’re going to check isn’t itself fully qualified, and there’s no reason to check against https vs http URLs, which our CDN (Cloudflare in this case) handles for us.

/* Staging and reverse proxy settings */

$public_url 		= 'https://public-server.com';
$production_server 	= 'production.example.com';
$staging_server 	= 'stage.example.com';

Setting and Removing Our Cookie

Mmmmm, cookies :-)

To set the cookie controlling our define( ‘WP_HOME’, “https://[www.example.com]” ); WordPress setting, we need to pick an arbitrary URL path to check for.

In this case, the parametric /?cookiesetter.

If the PHP $_SERVER variable matches, we execute the cookie setting code, then redirect with a 302 to the /wp-admin/ directory on our production server. A 302 redirect is used as the browser will remember 301 URLs in many cases, and may skip loading the requested URL and so the cookie isn’t set.

WordPress will automatically redirect to /wp-login/ if our visitor isn’t already logged in.

Note that we have ‘https://’ hardcoded in this redirect target, as we don’t want to risk a non-secure login page showing for a WordPress user.

We’re setting a cookie valid for 8 hours to match a working day. 3600 is one hour in seconds.

if($_SERVER['REQUEST_URI'] == "/?cookiesetter"){

	setcookie("admincookie", 'exists', time()+3600*8, '/', $production_server, true, true);  /* expire in 8 hours */
	header("Location: https://$production_server/wp-admin/", TRUE, 302);
	exit;

}

Removing the cookie is usually not needed, as we can go to the $public_url to see any changes made to the website, but it’s added as an option.

Again, we use a specific URL path – /?cookieremover – to trigger the code execution, give our cookie lifespan a negative number (this removes a cookie) and redirect to the homepage with ‘/’. We’ve not added the protocol (https://) as it doesn’t matter in this case.

if($_SERVER['REQUEST_URI'] == "/?cookieremover"){

	setcookie("admincookie", '', time()-3600, '/', $production_server, true, true);   /* expired, removes cookie */
	header("Location: /", TRUE, 302);
	exit;

}

Optionally, we could have redirected to the $public_url.

Staging Server Settings

Our staging server needs to set both WP_SITEURL and WP_HOME to itself so resources and internal links are self-referencing. In other words, how WordPress would work by default. This section ensures that should we take a backup from either stage or production and apply this to the other server, we’re executing the correct code.

Additionally, we need to keep the staging server out of the search engines’ indexes, so we set a new header with PHP to noindex all pages and resources on the staging server.

if($_SERVER['HTTP_HOST'] == 'staging_server'){
	
	define( 'WP_SITEURL', "https://$staging_server" );
	define( 'WP_HOME', "https://$staging_server" );

	header("X-Robots-Tag: noindex, nofollow", true);

}

Production Server Settings

This is where the dynamic handling of our two WP settings have a direct effect on the front end as experienced by the WordPress user. Effectively, we’re going to ensure anyone editing the site stays on the actual hosting server rather than directed to the $public_url and unable to do edits.

First, check we’re not on the staging server.

Note that we can’t* check for the production server, as the server will always see itself in the HTTP_HOST URL. The server does not see the $public_url without modifying headers such as x-forwarded-for. Similarly, the SERVER_NAME value also remains the same, and relies on server setup, rather than hosting location.

* OK, can’t is a strong word here. We could, but it would involve significantly more setup and testing from the client’s web team, and I want to minimize this.

Then, we check for our set cookie, and if available, set both WP_SITEURL and WP_HOME to the $production_server value. If not available, we set the WP_HOME variable to our $public_url.

Now, our user will see all internal links on the site point to $production_server/[path]. A user without this cookie would follow internal links to $public_url/[path], switching to the ‘real’ domain name we’re promoting.

if($_SERVER['HTTP_HOST'] != $staging_server ){
	
	if(isset($_COOKIE['admincookie'])){
			
		define( 'WP_SITEURL', "https://$production_server" );
		define( 'WP_HOME', "https://$production_server" );
		
	} else {

		define( 'WP_SITEURL', "https://$production_server" );
		define( 'WP_HOME', $public_url );
	}

}

Optionally, we could set the WP_SITEURL to our $public_url as well. Normally, the hosting server should serve resources faster than the reverse proxy server as an intermediate step for each request is removed. If using a CDN, test which performs better in your case.

Now we have a setup with wordpress behind a reverse proxy, a staging server which behaves correctly, and the client is able to edit, publish, backup and restore the site with a good level of user-friendliness.

Why not Check is_user_logged_in()?

The problem I encountered is that the user must be able to log in to WordPress before is_user_logged_in() is TRUE.

Unfortunately, the /wp-login/ page tends to redirect to the WP_HOME URL when submitting the login form, and so our user isn’t logged in.

Another solution we initially tested was using a list of IP addresses to control the WP_HOME and WP_SITEURL settings. This was an effective but not efficient solution that required programming skills to maintain and update each time a user connects from a new IP address.

Complete Code

Copy the following into your wp-config.php at or near the top to implement this solution. It should work fine once updated with your site’s settings, let me know if it doesn’t and I’ll try to help.

/* Staging and reverse proxy settings */

$public_url 		= 'https://public-server.com';
$production_server 	= 'production.example.com';
$staging_server 	= 'stage.example.com';

/* Staging and reverse proxy code */

if($_SERVER['REQUEST_URI'] == "/?cookiesetter"){

	setcookie("admincookie", 'exists', time()+3600*6, '/', $production_server, true, true);  /* expire in 6 hours */
	header("Location: https://$production_server/wp-admin/", TRUE, 302);
	exit;

}

if($_SERVER['REQUEST_URI'] == "/?cookieremover"){

	setcookie("admincookie", '', time()-3600, '/', $production_server, true, true);   /* expired, removes cookie */
	header("Location: /", TRUE, 302);
	exit;

}

if($_SERVER['HTTP_HOST'] == 'staging_server'){
	
	define( 'WP_SITEURL', "https://$staging_server" );
	define( 'WP_HOME', "https://$staging_server" );

	header("X-Robots-Tag: noindex, nofollow", true);

}

if($_SERVER['HTTP_HOST'] != $staging_server ){
	
	if(isset($_COOKIE['admincookie'])){
			
		define( 'WP_SITEURL', "https://$production_server" );
		define( 'WP_HOME', "https://$production_server" );
		
	} else {

		define( 'WP_SITEURL', "https://$production_server" );
		define( 'WP_HOME', $public_url );
	}

}

Photo by Lavi Perchik on Unsplash
Stop People Copying Your Content with only HTML & CSS

Today I came across a website which had disabled copy and highlighting of the text, even when I turned off JavaScript in the browser. Curious, I researched how this stop content copying was accomplished.

I found that there’s both multiple CSS extensions and a CSS directive which disables a user selecting text on an element. Further, you can disable the right-click menu with an attribute.

Here’s how to disable copy and paste on websites.

First, adding the attribute & value oncontextmenu=”return false” to a page element will disable the right-click menu.

<body oncontextmenu="return false">

The CSS directive user-select: none; will disable highlighting and copying. The directive is well supported in modern browsers, apart from Safari on iOS and desktop.

This example CSS class includes all prefixes (only the two initial prefixes are needed currently) that can be applied:

.nocopy {
 -webkit-touch-callout: none;
 -webkit-user-select: none;
 -khtml-user-select: none;
 -moz-user-select: none;
 -ms-user-select: none;
 user-select: none;
}

Example usage:

<body class="nocopy">

Prefixes listed against browser usage:

iOS Safari-webkit-touch-callout: none;
Chrome/Safari/Opera-webkit-user-select: none;
Konqueror-khtml-user-select: none;
Firefox-moz-user-select: none;
Internet Explorer/Edge-ms-user-select: none;

I would definitely avoid this on a production website, as it’s incredibly user un-friendly and looks a bit dodgy. After all, your visitors arrive to read / learn from your content. Often that involves taking notes / clippings for use elsewhere.

It’s an interesting option however.

Fix MyISAM MySQL Tables with myisamchk

At times MyISAM tables in MySQL can crash and repair with PHPMyAdmin or from within the MySQL Server console won’t work. In these cases, this is how to repair (recover) the MyISAM table with myisamchk using these steps:

Go to the database directory with:

cd /var/lib/mysql/[database name]

Run myisamchk with:

myisamchk -r [table name]

Should that fail, use:

myisamchk -r -v -f [table name]

The flags mean:

  • -r = recover
  • -v = verbose
  • -f = force

https://dev.mysql.com/doc/refman/8.0/en/myisamchk-repair-options.html

Screaming Frog Tips & Tricks

This is an aide memoire for myself, but if you have found really useful Screaming Frog tips to get the most out of the tool, please leave a comment or email me at hello@jacknorell.com.

If I include the tip, you’ll get a link back to your blog or Twitter handle.

Find unlinked mentions

If you have a long list of URLs where your brand or product is mentioned, and you want to find out which pages do or don’t link back to you, this custom filter in Screaming Frog will be useful:

<a [^>]*?href=(“|’)?http(?:s)?://(?:www\.)?YOURSITE\.com[^>]*?>

(updated to better match a link tag)

Go to Configuration and select Custom, then enter   like this:

Regular expression used in Screaming Frog custom filter
Use regex with a custom filter

Check if page is linking to your site

By using “Contains” in the Custom settings, the filter will find if the page is currently linking to your site, though in this version not whether it is nofollowed.

If you have a modified RegEx to check for nofollow links, please do share in comments.

Match anything including New Lines with RegEx

Within Screaming Frog, the expression .* matches everything except new lines and returns, so if the HTML you want to match looks like this:

<div name=”examplediv”>
<span>Extract This Text</span>

That default expression won’t work. However, if you use (?s).* instead, it will work just fine.

Regex for Inclusion or Exclusion must match full URL string

Screaming Frog only reliably matches on the full URL evaluated. This means that this regex won’t work in all cases:

/\d{12}$

What this would normally do is include or exclude all auction listing pages on Ebay.co.uk that look like:

https://www.ebay.co.uk/itm/%5Bauction-name%5D-/141736421954

That regex should match the twelve-digit auction ID number ending the URL. However, a range of these will still be included when crawling. Updating the regex to the following, to evaluate the whole URL, will work:

.*/\d{12}$

Extract anchor text from links to a site

This is a bit messy, but if a page is linking to example.com, it will extract the text from ‘example.com’ to the next closing anchor tag </a>.

This may at times capture other HTML tags that wrap the anchor text itself inside the <a> tag, if those tags have spaces before or after as the regex currently does not handle spaces well. You can find these easily by running a =find(“<“, [cell reference]) to locate any tag opening sharp brackets, then clean up manually.

href=.*?example\.com.*?>(?:<.*?>)*?(.*?)(?:<.*?>)*?</a>

Note that only the first link’s anchor text will be extracted. If the page has more than one link to example.com, you will need to use a script to break up the page source code and iterate through the resulting text strings.

If you have a more sophisticated working example, please share in the comments.

This Screaming Frog tips article is regularly updated

More Screaming Frog tips & tricks will be added over time.

302s in site moves? It’s OK, if you must

In John Mueller’s webmaster hangout on 6 Nov 2015, I noticed a few comments on website moves which are interesting and go against standard recommendations for SEO.

In a site move (new domain name), Google considers 302s and 301s as equivalent.

“It’s not the case that 302s do something magical to block the flow of PageRank” – John Mueller

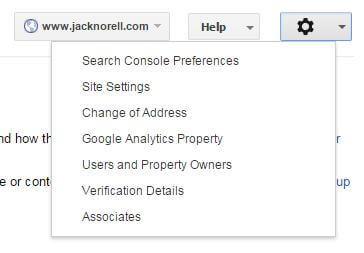
302s in a sitemove will pass PageRank as the redirects will be seen as a moved domain, not a temporary redirect. I’m assuming the requirement is also that the change of address (site move) is set in Google Search Console under site settings:

change-of-address-in-google-search-console

How long it takes for the new URLs to show rather than old ones is hard to say. John Mueller says it’s from hours to maybe a day.

“What will probably happen is that for some URLs on your site, it will take a little bit longer, for some it will go a lot faster.”

This is based on how Google crawls a website, indicating that the moved page needs to be recrawled after the change of address setting & redirects are live before the move takes effect.

The full move can take up to half a year, maybe longer.

If a site:oldsite.com advanced query is used, the indexed pages won’t drop out of the SERPs entirely until the site’s indexed pages are fully recrawled. Conversely, a site:newsite.com query will show a fast initial growth in indexed pages, and then a trickle of further URLs added over time.

Note that 301s are recommended by Google in their guidance for site moves.

“Set up server-side redirects (301-redirect directives) from your old URLs to the new ones. The Change of address tool won’t function without it.”

In other words, it’s still best practice to use 301s.

But if you’re not able to use 301 redirects, you can use 302 redirects in site moves without losing PageRank.

Search Bootcamp Ecommerce Ranking Factors Roundtable

On 22 June 2015 I led a roundtable discussion at SEO Bootcamp in London, the discussion covered various eCommerce optimisation issues, and a range of challenges the delegates were currently working on.

eCommerce Roundtable Discussion

“Let’s sit down and talk about unique content, social signals, page titles, content marketing, brand entities, site speed, SSL certificates, image optimisation, re-marketing, XML sitemaps, videos, internal linking, external linking, toxic backlinks, negative SEO, search themes, local search optimisation, Google Now, crawl budget optimisation, keyword research, call tracking, information architecture, merchandising, schema markup, tracking pixels, up & cross-sell tactics, analytics, conversion tracking… feeling overwhelmed by what your ecommerce siteactually needs to perform and make more money? You’re not alone. Centred on Google and Organic Search, this is an intense 60 minute roundtable to cut through the FUD and focus on the activities that bring returns.”

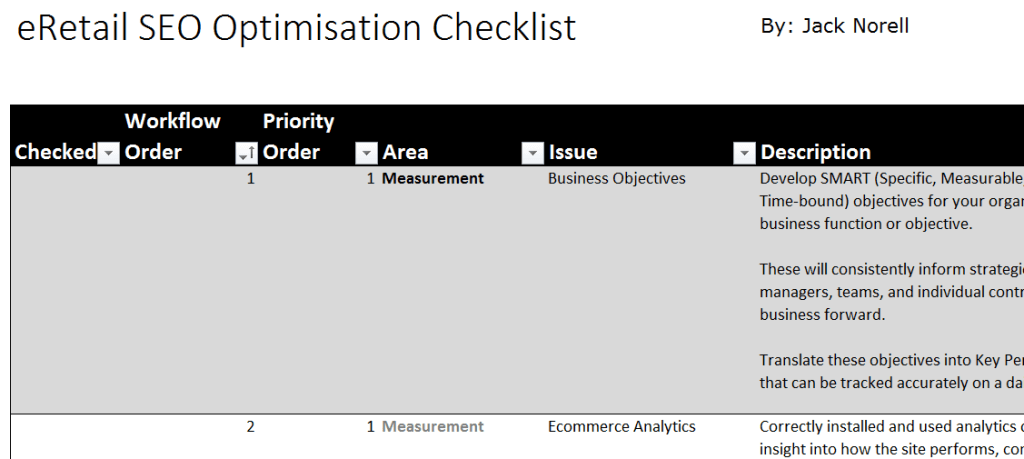
The slides are a summary of a checklist I use to quickly review and prioritise outstanding issues I find with eCommerce websites. The current version of this tool is linked below:

Download the eCommerce Optimisation Checklist

About Search Bootcamp

Search Bootcamp is a full day set of workshops and roundtables allowing SEOs to get together and learn about new developments in search and meet the experts in person. It’s organised by the SEO Monitor team, and you should take a look at their toolset.

Many thanks to my fellow presenters Kelvin Newman(@kelvinnewman), Alexandra Tachalova (@AlexTachalova), Cosmin Negrescu (@ncosmin), Andy Cooney (@Andy_Cooney), Ann Stanley(@AnnStanley), Joe Shervell (@eelselbows), Bastian Grimm (@basgr), and Alec Bertram (@kiwialec) for making it a great event.

And thank you also to Maria, Irina, and Cosmin for inviting me to present.

Resources

eCommerce Ranking Factors Slides
eCommerce Optimisation Checklist

Speaking at eComTeam 2015, Brasov, Romania

I’m proud to be invited to run a workshop and speak at the premier eCommerce conference in Romania, eComTeam. For the conference’s 3rd year, it’s doing a 302 redirection to Brasov in central Transylvania rather than staying in Bucharest.

eComTeam 2015 website

There’s a range of fantastic speakers lined up this year, such as Lukasz Zelezny, Violeta Luca, Tamsin Fox-Davies, Alexandru Lapusan, and Judith Lewis. Full line-up here.

On Day 1, I’m presenting the closing slot and will be presenting some thoughts on SEO & eCommerce over the next few years, as well as rounding up some highlights of the day. I’m calling this “What May Come Next – A review of trends & technologies that will impact how we interact with others, use digital media and shop in 2015 to 2020”.

My workshop for Day 2 is eRetail: From average to great in 2015, from the conference programme:

“This year you can rocket your site up the rankings and boost your profits by improving search engine performance and customer appeal. With best practice across content, UX and Search Engine Optimisation, this workshop gives you a comprehensive roadmap to follow. And we’ll also share the worst SEO errors to avoid.”

In the run-up to the conference, I also took part in a Q&A for Wall-Street.ro, the premier business magazine in Romania with the title Expert SEO: Tribul tau este format din 0,1% din piata. Fa-l sa te adore (in English; Expert SEO, Your Tribe Is 0.1% Of The Market. Learn To Love It).

A version in English is published at the Forward3D blog:

SEO Advice for Start-Up Businesses

I will be making materials and slideshows available here and on my Slideshare account once the conference is over.

The presentation slides are below:

Using Google Translate in Your Google Spreadsheets

translation

Google Translate works very well together with Spreadsheets to turn whatever language you don’t read into your own (or English of course). Once you’re acquainted with the functions used, you’ll quickly be able to modify your original text into whichever language you require. With a bit of clever work, you could automate processes, by connecting your sheet with If This Then That (IFTTT). Below I’m providing two examples of applications I’ve found useful.

But first, we’ll review the formulas.

The formulas

Google spreadsheets has two formulas to help you both translate and identify the language of text within a column.

=GOOGLETRANSLATE(text, [source_language],[target_language])

You can also set the [source_language] to auto-detect by using “auto” instead of a source language code, like this:

=GOOGLETRANSLATE(text, “auto”,”en”) to translate these anchor texts into English.

You don’t need to set the target language, as it will default to the language used in the spreadsheet.

The second formula can help you filter by language:

=DETECTLANGUAGE(text_or_range)

Full list of 2 letter ISO language codes on Wikipedia.

Translating backlink anchor text

In my consulting work, my team and I often come across backlinks in a range of languages and alphabets. Of course, this makes it difficult to evaluate backlink profiles: Is that anchor text a Brand, Compound, Money or Other term in our classification? Rather than just shrug our shoulders and chuck all of these incomprehensible text snippets in either Money or Other, I decided that using Google Spreadsheets to translate the lot would be more helpful.

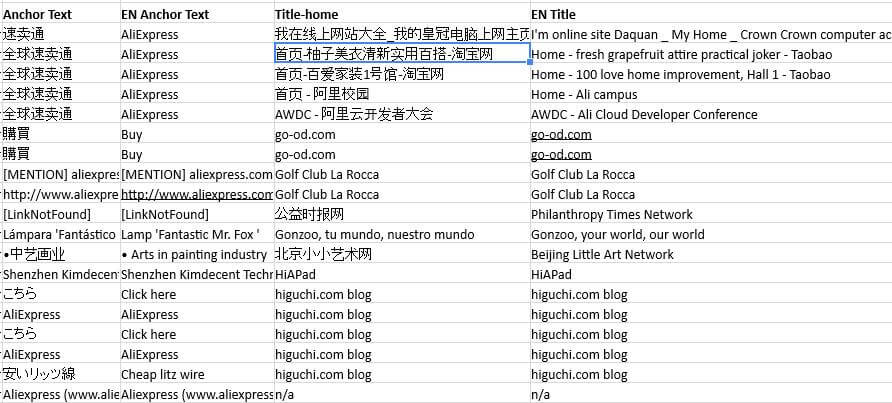
To ensure that I got a broad selection of non-English anchor texts, I pulled the backlinks for Aliexpress.com. As they’re in mostly Chinese, it came in handy for the example. Removing the unnecessary columns, we are left with this:

Aliexpress backlinks
Backlink examples for Aliexpress.com

By using the formula =GOOGLETRANSLATE(D8, “auto”, “en”) in the appropriate columns, we’ll end up with a translated text.

GoogleTranslate formula Aliexpress
Translating with auto-detect to English

Copying the formula down the sheet, and waiting a few moments, we end up with results. I also translated the link source page titles to further illustrate how useful these functions are:

Translated Aliexpress results
The anchor texts and page titles translated

In our work, we would now be easily able to classify the anchor texts in the right groupings.

Auto-translating Google Reader replacement

While Google Reader is no more, Spreadsheets can use the ImportFeed formula to import RSS or Atom feeds.

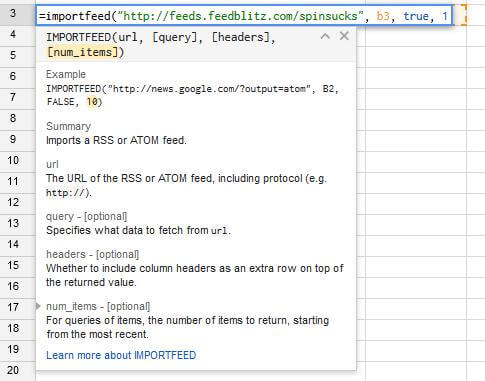
=ImportFeed(URL, [feedQuery | itemQuery], [headers], [numItems]). Formula arguments are the following:

URL is the url of the RSS or ATOM feed.

feedQuery/itemQuery is one of the following query strings: “feed”, “feed title”, “feed author”, “feed description”, “feed url”, “items”, “items author”, “items title”, “items summary”, “items url”, or “items created”. The feed queries return feed properties; the feed’s title, the feed’s author, etc. If you want the feed data, do an “items” request.

  1. the “feed” query returns a single row with all of the feed information
  2. the “feed ” query returns a single cell with the requested feed information
  3. the “items” query returns a full table, with all of the item information about each item in the feed
  4. the “items ” query returns a single column with the requested information about each item
  5. using a “feed” query, the numItems parameter isn’t necessary and is replaced by the option headers param
  6. with an “items” query, the numItems parameter is expected as the third parameter, and headers as the fourth
  7. headers – “true” if column headers is desired. This will add an extra row to the top of the output labeling each column of the output

Building the spreadsheet

I decided to grab content from Spin Sucks for this example:

ImportFeed formula example
Pulling in the Spin Sucks RSS feed

ImportFeed Results
The ImportFeed formula output

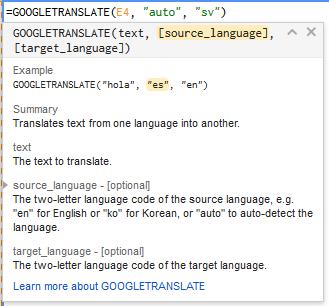
Now for translating the contents of the feed. I picked Swedish (my birth language) by using the formula =GOOGLETRANSLATE(E4, “auto”, “sv”)

GoogleTranslate to Swedish
Formula to translate source into Swedish

And the results are predictably poor but understandable Swedish:

GoogleTranslate Swedish Results
Translating feed text into Swedish

The above is of course a very basic implementation of the formulas, but gives you a starting point to develop from.

Other useful import queries

IMPORTXML: Imports data from any of various structured data types including XML, HTML, CSV, TSV, and RSS and ATOM XML feeds.

IMPORTRANGE: Imports a range of cells from a specified spreadsheet.

IMPORTHTML: Imports data from a table or list within an HTML page.

IMPORTDATA: Imports data at a given url in .csv (comma-separated value) or .tsv (tab-separated value) format.